Fluids in Motion | Fun Science Experiments
Daniel Bernoulli (1700-1782) was a Swiss mathematician and physicist best known for his work involving fluid dynamics. He began studying fluids because he was interested in studying the pressure and flow of blood in the human body.
His painful method of measuring blood pressure involved inserting a hollow glass tube directly into a patient’s artery and measuring the height of the blood pumped into the tube with each beat of the heart. Thankfully, this method of measuring blood pressure was replaced by the less-painful blood pressure cuff invented by Scipione Riva-Rocci in 1896.
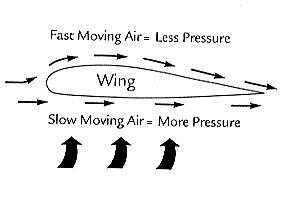
From his experiments, Bernoulli concluded that when a fluid is moving faster, it has lower pressure. This is known as Bernoulli’s Principle, and it is used to explain many scientific ideas from the movement of weather systems to the lift created by an airplane’s wing. The following simple demonstrations will allow you to play with some fun toys and learn a bit about the natural science of fluids (liquids and gases) in motion. [Countdown: Easy Answers to the Top 5 Science Questions Kids Ask]
Experiment 1
A fluid stream that comes in contact with a gently curved surface will tend to follow that surface.
Run a gentle stream of water from a faucet. Holding a tablespoon parallel to the running water, gently introduce the curved back of the spoon into the running water.
What happens to the stream of water?
Turn the spoon around so the bowl side of the spoon is in the stream — How is the result different? On which side is the water moving faster?
Get the world’s most fascinating discoveries delivered straight to your inbox.
Experiment 2
A faster-moving fluid has less pressure than a slower-moving fluid.
Even though you can’t see it, air is a fluid! When a column of air is moving faster than the air around it there will be less pressure where the air is moving quickly.
What you will need:
- 2 pingpong balls
- 2 pieces of thread about a foot long
- Tape
- Soda straw
What to do:
Tape the thread to the pingpong balls and suspend the balls from a towel rack or bar so that they are about a half-inch apart. Use the soda straw to blow a column of fast moving air between the balls.
In what direction do the balls move? If the swift moving air between the balls has less pressure than the rest of the air in the room, how does this explain what happened? Try moving the balls closer and farther apart. How does this change what happens and why?
Experiment 3
How to fool your friends using Bernoulli’s Principle
What you will need:
- A funnel
- A pingpong ball
What to do:
Place the pingpong ball on the table and put the funnel over it. Challenge your friends to turn the funnel right side up with the ball in the funnel — without touching the ball or scooting the funnel to the table edge.
This trick takes some practice and a lot of wind power — but you should be able to blow into the narrow end of the funnel to lower the pressure inside, raising the ball high enough to turn the funnel right side up! Remember you have to continuously blow into the funnel as you turn it!
Experiment 4
How does Bernoulli’s Principle explain how the shape of an airplane wing creates lift?
What you will need:
- A sheet of typing paper
- A piece of thread or smooth string about a yard long
- A hole punch or sharp pencil
- Tape
What to do:
Make a sharp crease in the typing paper about a third of the way up from the bottom.
Unfold the crease and tape the top edge of the paper to the bottom edge. You should now have an airfoil shape with a flat bottom surface and a gently curved top surface.
Using the curved part as the front of your airfoil, and the narrow taped edge as the back, punch a hole in the top and bottom of your airfoil. Thread the string through the holes.
Hold the string vertically with one end in each hand and the airfoil at the bottom of the string. Spin in a circle or run and watch your airfoil rise up the string.
Is the air moving more quickly over the top of the curved paper or under the bottom flat side? How do you know? Look closely at the wings on an airplane. What is the shape of the wing? How does this help explain how a heavy airplane can fly?
Experiment 5
How does a helicopter create lift?
What you will need:
- Typing paper
- Ruler
- Pencil
- Scissors
- Small paperclip
What to do:
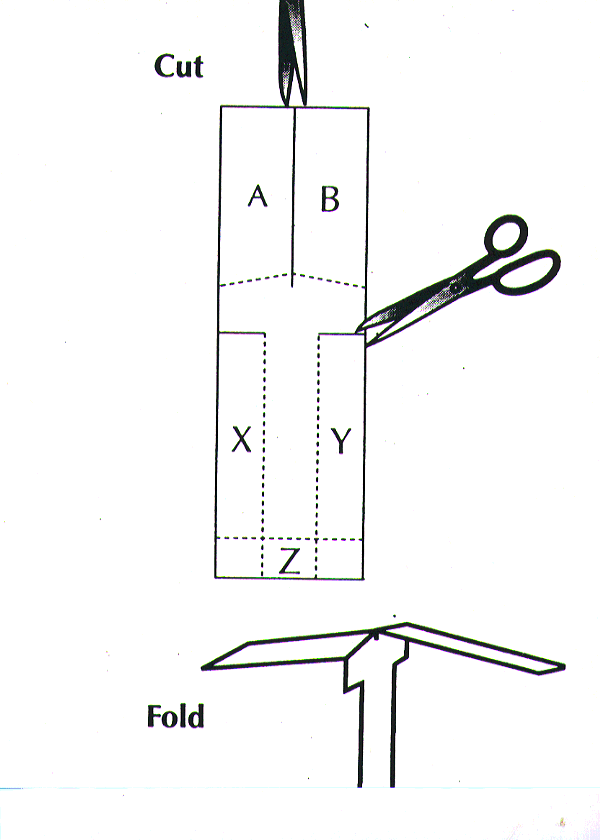
(See illustration)
Cut a rectangle 4 by 8 inches (10 by 20 centimeters) from the sheet of typing paper.
Cut a straight line down the middle of the rectangle — stop almost half way down.
About one-eighth inch from the bottom of the first line, cut slits about one-and-a-half inches from the edges of the paper.
Fold up along the dotted lines so that the "X" and "Y" rectangles make the stem of the rotor. Then fold the bottom edge "Z" up a quarter-inch and add a paperclip to it for weight.
Fold rectangle "A" upward. Fold rectangle "B" downward.
Drop your helicopter from overhead and watch it spin slowly to the ground.
Where is the air moving more quickly? What force is making the air move? How does this create lift? If you live in an area where maple trees are common, study their “helicopter” seeds in the spring. What would be the advantages of this seed dispersal system?
 Live Science Plus


